Tutorial: Using Github Webhooks with Backstage Entity Provider

Min Kim
May 3, 2022
Entity Providers are a more scalable and robust alternative to Entity Processors. The Backstage team introduced Entity Providers to solve problems that big deployments of Backstage were experiencing with the ingestion pipeline. If you take a look at their documentation on The Life of an Entity, it illustrates how your new ingestion pipelines should be structured.
Before the Entity Providers came into the picture, the preexisting processors essentially took on the roles of both the entity providers and the processors described in the documentation. I bring this up as it may provide clarity to anyone confused by some of the overlapping functionality of the current processors and entity providers in the Backstage plugins; some of those processors have not yet been updated to adapt to the new proposed ingestion pipeline.
Getting back to why Entity Providers were introduced, there are some common issues with ingestion processors:
- The processing queue would get filled with no-op processing, putting pressure on external systems. In some cases, it leads to rate limiting requests.
- Writing performant custom processors required implementing caching, which many teams did not.
- Failure in external service leads to the creation of orphan entities, which disappear components from the catalog.
Entity providers eliminate these problems by giving developers complete control over the execution of ingestion:
- Entity Providers do not have an implicit queue that drives their execution; instead, developers specify the mechanism that drives each entity provider. A driver for an entity provider can be a simple callback that runs on an interval, an event listener triggered by a Web Socket connection, or a response to the HTTP request.
- There is no need to cache requests because there is no implicit orphaning of entities. Entities are only mutated when the Entity Provider calls commitMutation on the connection. The developer can control update frequency by configuring the mechanism that drives the entity provider.
- Entity Providers automatically handle efficiently merging small changes to many entities without explicitly applying deltas. It’s possible to use just the deltas if the data source provides them.
Since entity providers do not have an implicit queue, you’ll need to specify what drives each entity provider. You could use a task scheduler and specify the frequency of entity provider executions. Ideally, your entity provider would respond to changes in the original data source and remain idle all other times. Developers can accomplish this with webhooks and streaming.
In this tutorial, we'll walk you through the steps of adding GitHubOrgEntityProvider to your catalog and then show you how you can configure Github Webhooks to trigger mutations to your Backstage database.
Adding an Entity Provider
Assuming you already have your own instance of Backstage, let's install the necessary packages for adding the Github Org Entity Provider:
yarn workspace backend add @backstage/plugin-catalog-backend-module-github @backstage/integration
Then you can import the provider to your catalog builder in packages/backend/src/plugins/catalog.ts. Be sure to replace the orgUrl with your own:
- import { CatalogBuilder } from '@backstage/plugin-catalog-backend';
+ import { CatalogBuilder, EntityProvider } from '@backstage/plugin-catalog-backend';
...
+ import { ScmIntegrations, DefaultGithubCredentialsProvider } from '@backstage/integration';
+ import { GitHubOrgEntityProvider } from '@backstage/plugin-catalog-backend-module-github';

export default async function createPlugin(
  env: PluginEnvironment,
): Promise<Router> {
  const builder = await CatalogBuilder.create(env);
  builder.addProcessor(new ScaffolderEntitiesProcessor());

+  const integrations = ScmIntegrations.fromConfig(env.config);
+
+  const githubCredentialsProvider = DefaultGithubCredentialsProvider.fromIntegrations(integrations);
+
+  const gitProvider = GitHubOrgEntityProvider.fromConfig(env.config, {
+    id: "github-org-entity-provider",
+    orgUrl: "https://github.com/my-organization", // 🚨 REPLACE
+    logger: env.logger,
+    githubCredentialsProvider
+  });
+
+  builder.addEntityProvider(gitProvider as EntityProvider);

  const { processingEngine, router } = await builder.build();
  await processingEngine.start();

  return router;
}
If you try to run your Backstage app, you should notice nothing has changed in your catalog. As mentioned earlier, developers must provide the mechanism that will drive the entity provider. For the sake of this example, let's add the GitHubOrgEntityProvider's read() at the end of our catalog builder:
  await processingEngine.start();
+  await gitProvider.read();

  return router;
}
When you restart your Backstage, you should see the members and teams of your organization. If you do not, you should check the permissions of your Github authentication. Whether you're using a personal access token or a Github App, you need to make sure it has permissions for read:user and read:org.
Calling read() towards the end of the catalog building process will only update your database once during deployment so now we're going to configure a webhook to trigger the updates.
Configure Github Webhook
Let's start by creating your webhook on Github. From your Github organization's settings page, click Webhooks in the side bar and then Add webhook.
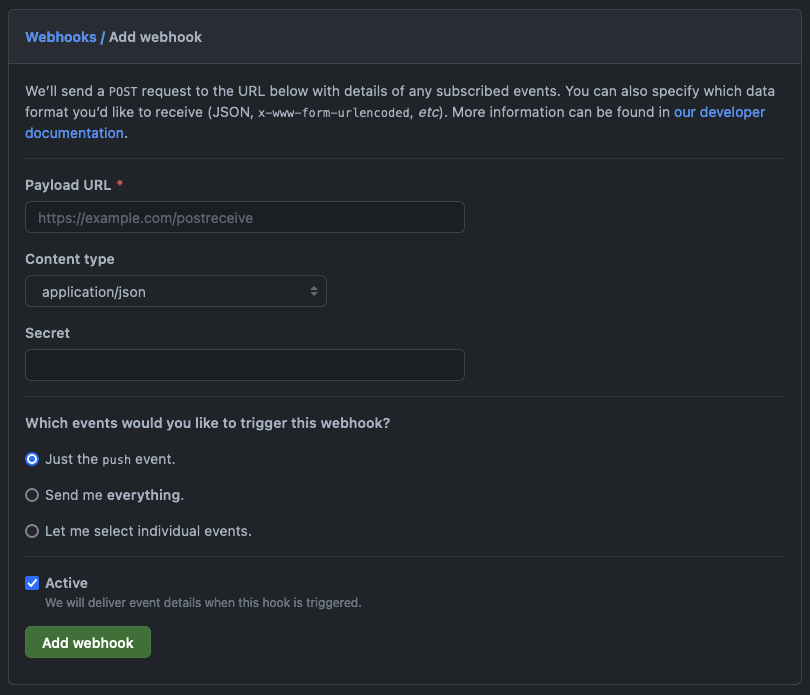
You can get a Payload URL from smee.io - this is a service that proxies payloads from your webhook for local development.
Set the content type to application/json and let's specify the events we want by selecting Let me select individual events. The GitHubOrgEntityProvider adds users and teams to your catalog so the webhook events we want to receive from Github are Orgnaization and Teams.
For your actual deployment, you'll want to modify the Payload URL from the smee URL to the URL of your live Backstage app.
Once the webhook is added, you should follow the instructions displayed on smee.io to install their client and use http://localhost:7007/api/catalog/github/webhook as the target URL.
Next, update your catalog builder so that it runs read() when a webhook event is posted to /github/webhook:
  await processingEngine.start();
-  await gitProvider.read();
+  router.post("/github/webhook", async (req, _res) => {
+    const event = req.headers["x-github-event"];
+    if (event == "membership" || event == "organization) {
+      await gitProvider.read();
+    }
+  })

  return router;
}
If you run the smee client and your Backstage app, you'll see that the entity provider will update the database only when a webhook event is posted by Github.
If you have concerns of the possibily of a webhook being missed, you might want to consider using the Backstage task scheduler to run read() once a day for that extra assurance.
What's next?
In this tutorial we quickly went over the steps of adding an entity provider to your catalog and using smee to proxy webhook events to your local environment, but this is just the beginning!
If you look at the implementation of GitHubOrgEntityProvider, the read() function queries data directly from Github and runs a full mutation. In its current state, depending on the size of your organization, your read() function might end up triggering way too frequently - resulting in too many Github requests and performing a full mutation of your database each time.
When you create your own custom entity provider, you will want to create a function that applies a delta mutation just from the data received from the webhook events. You can read more about the mutation types here.